Passing on the move is a cornerstone of my practices. It gives me a way to work on fundamentals, movement, timing, and decisions within the same activity.
I often use it during the preparation or warmup phase. Players start moving and thinking together from the beginning of practice.
One series I call “Flying Balls” keeps several balls moving through the group. Players must track the action, coordinate with teammates, and stay ready for the next delivery.
I prefer using the full court when possible. That gives us room to connect passing with running and transition habits.
What the drill should teach
Passing technique is only part of the work. Players must move without the ball, create useful passing angles, and recognize where the next opportunity is developing.
With several balls in play, attention cannot stay on a single action. Players need to communicate, prepare to receive, and connect their movement to teammates.
The value comes from linking those demands. A clean pattern is a starting point. The goal is players who can use the principles in the game.
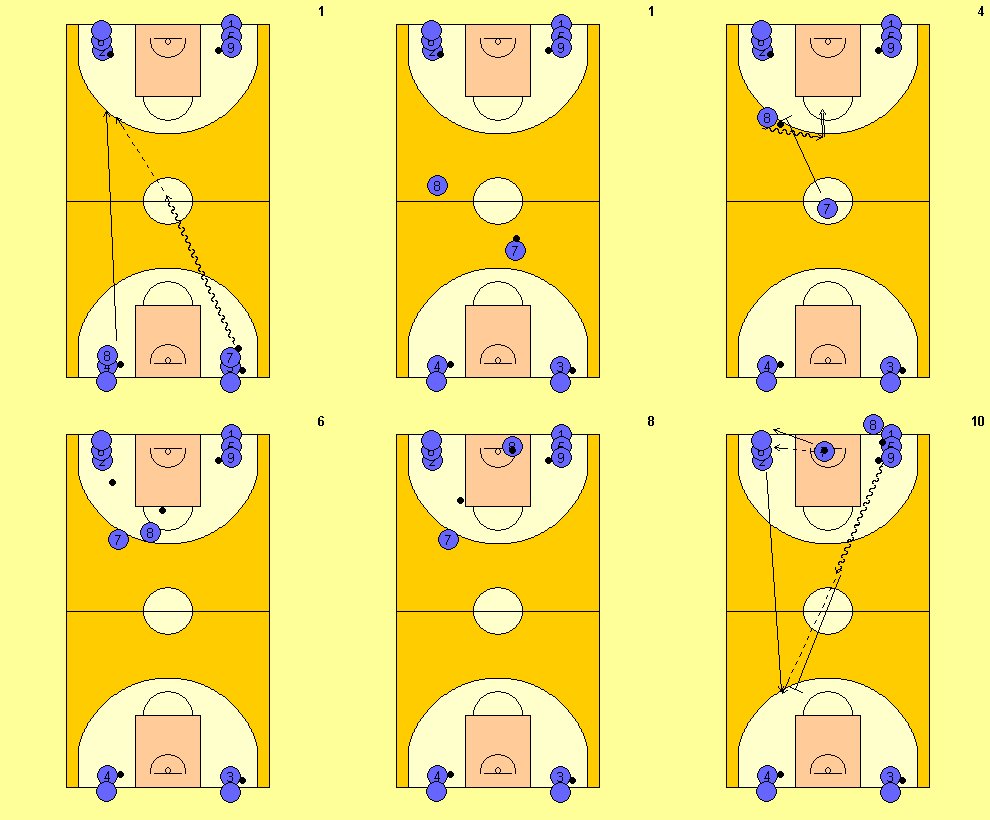
1. Pairs: Pass, cut, and finish
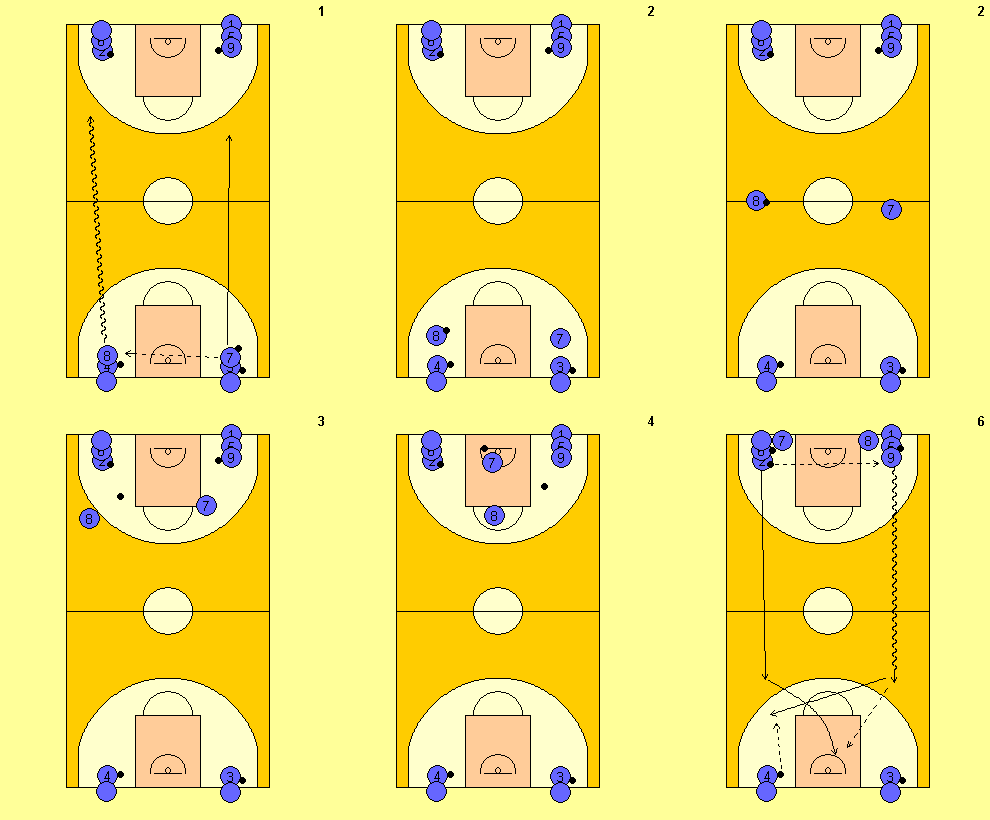
Use the numbered positions in the original animation. Player 7 passes to 8, who advances toward the opposite end. Player 7 cuts to the basket, receives the return pass, and finishes beyond the rim.
Player 8 then moves across to receive a separate ball from 9 and shoot. As soon as 9 feeds 8, player 2 passes to 9 and the next pair starts toward the other end.
I generally prefer bringing the cutter from the weak side toward the strong side. That is a deliberate preference in this series, rather than automatically sending the passer straight toward the ball in a conventional give and go.
Vary the finish and the movement according to what your players need.
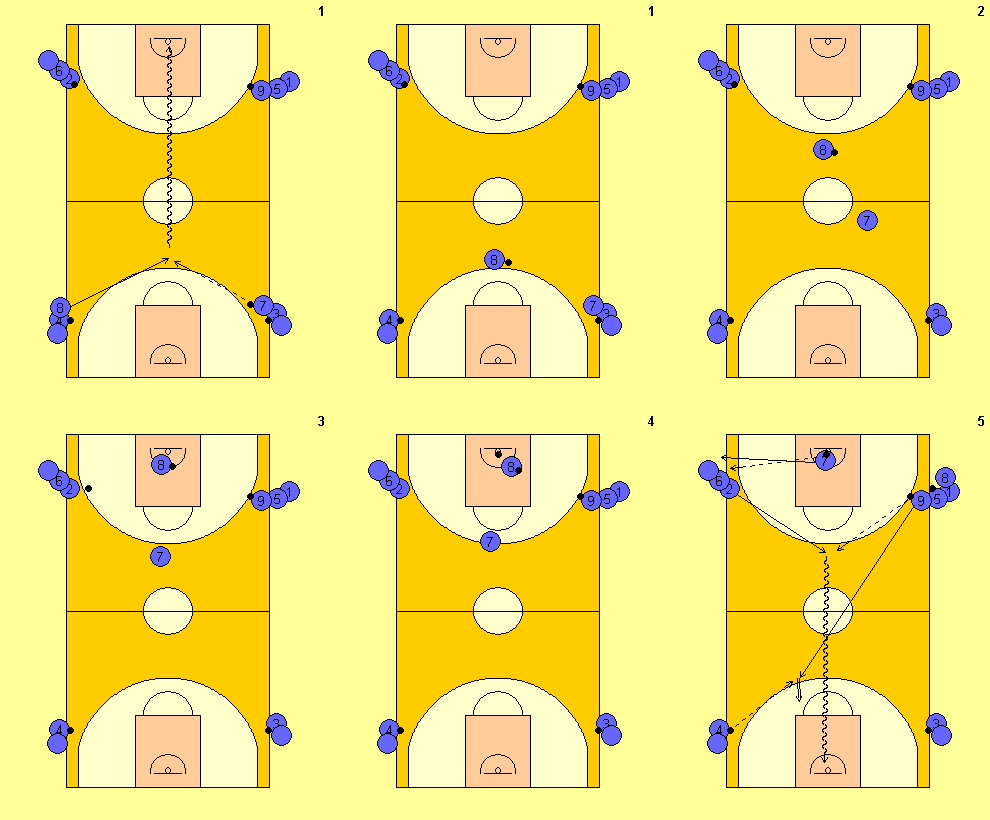
2. Pairs: Add a ball screen
Player 7 begins by dribbling toward half court, passes to 8 while moving, and continues into a pick and roll.
Use the animation to organize the sequence and the next feed. The drill can prepare players for transition actions while retaining a clear passing focus.
An early pick and roll is not my personal first choice in an offense. I include this version because it is common in transition basketball and can be practiced within the same structure.
3. Pairs: Change the starting positions
Keep the principle but change the alignment. Different starting positions create different angles, deliveries, and movement problems.
Use cuts, screens, and finishes that connect to your team’s game. You can also take one useful action out of the sequence and teach it in a simpler setting before returning to the full drill.
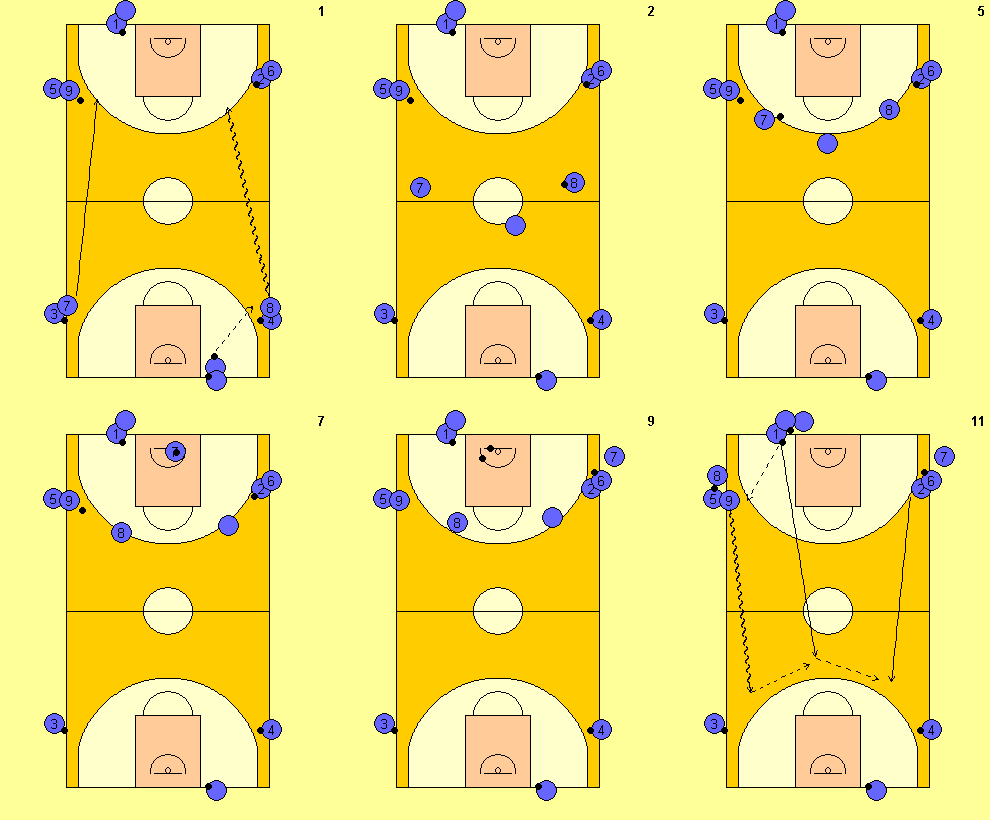
4. Trios: Swing the ball and create three shots
Player 8 advances the ball. Swing it to the opposite side and create the first finish for 7.
Player 0 screens for 8, who moves off the screen and receives a separate feed from 3 for a three point attempt. Player 0 continues toward 2 and receives the final ball for another three point attempt.
The extra feeds let all three players finish a connected sequence. Follow the numbered animation to place the feeding players correctly.
For a competitive version, count how many of the three shots the group makes. Compare complete trios using the same number of turns.
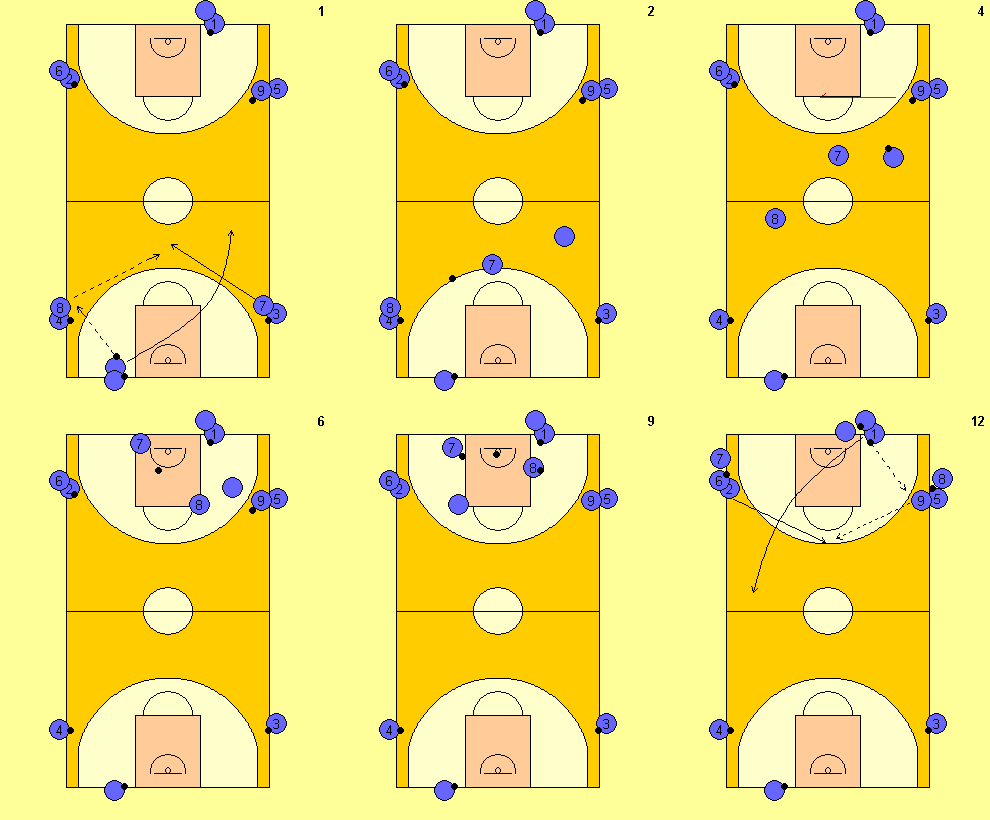
5. Trios: Connect the weak side and strong side
Use the same foundation while emphasizing movement from one side of the floor to the other.
The idea is to move strong defensive pressure away from the ball and bring a less pressured player toward it. Swinging the ball also teaches players to use both sides of the court.
In the illustrated sequence, player 0 dribbles beyond the free throw line. This positioning creates passing possibilities inside and outside. Build the next movement around the principles you teach your team.
6. Fours: Swing and continue
Move the ball to the weak side and connect the other players’ movement to that transfer.
Adapt the actions to your offense. The animation separates moments so the sequence is readable, but the players do not have to wait for every previous action to finish. Several movements can develop at the same time, with separate feeds leading to different shots.
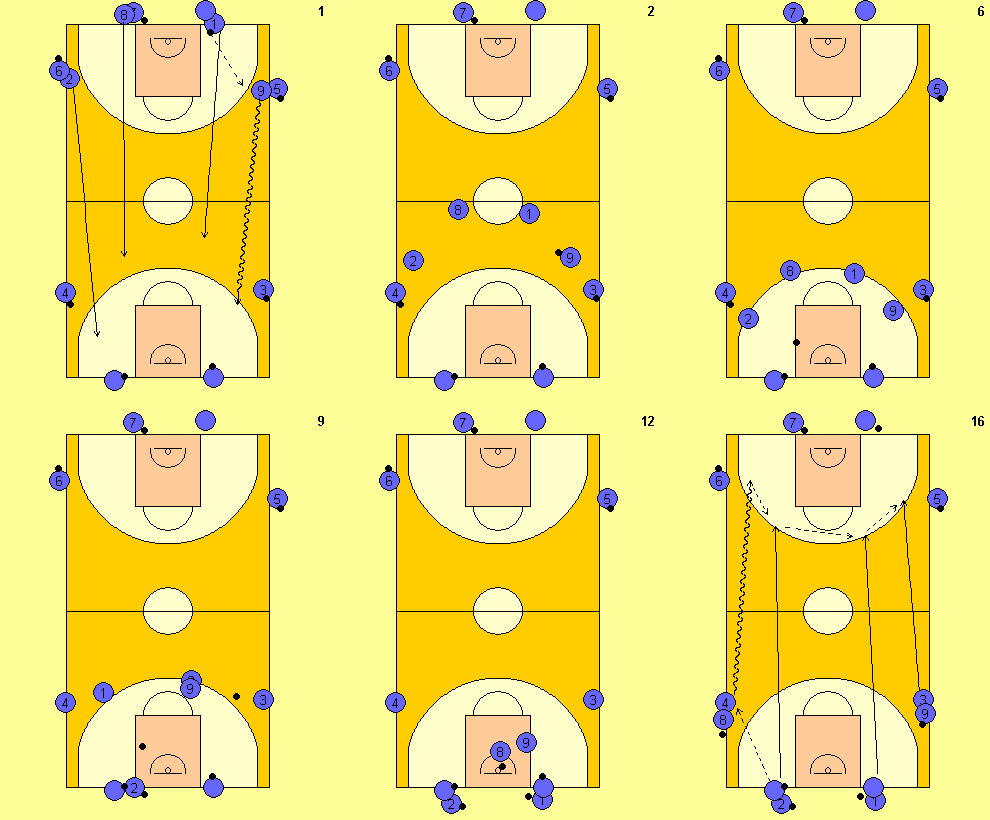
7. Fours: Let players choose and react
This is a variation I use less often. Each player chooses an action, and the others must respond.
The coach signals which of the remaining balls becomes live. Players organize around that information. A player who receives a ball finishes and clears the playing area.
Do not fear a practice that looks less orderly. Teach players how to deal with an unplanned situation while you control the boundaries of the activity.
This version is about responding to teammates and changing information. It should not become several disconnected actions with no shared awareness.
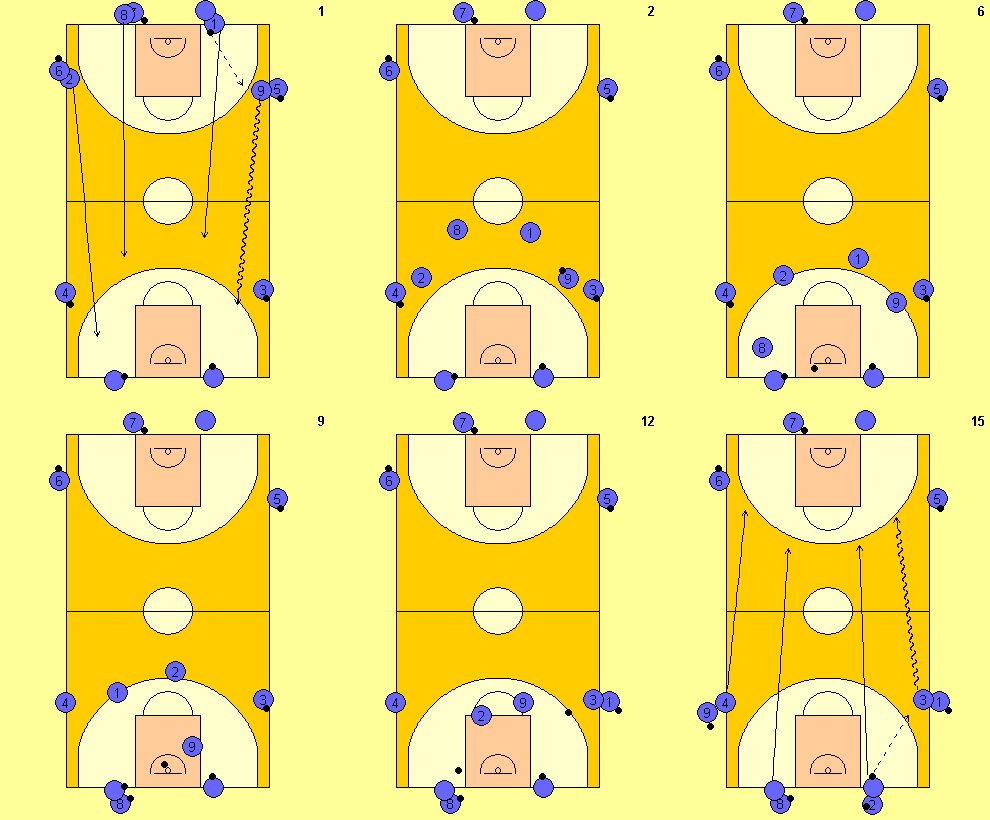
Keep the progression connected to your team
Use the full court when available. If you only have half a court, reduce the space and organize the same passing and cutting principles within it.
Start with the structure players can handle. Add balls, movement choices, and pressure as the group becomes ready.
Keep correcting the fundamentals inside the activity: a useful passing angle, a prepared receiver, accurate placement, and movement that creates the next opportunity.
The drill earns its place when players carry those habits into team play.
Related practice from REACT CRT
This related workout connects visual information with basketball action. Use it alongside the principles in this article. It is a separate practice example, rather than a demonstration of every sequence described above.
Article 5 of the passing series. Adapted from Coach Yoed Agmon’s original article.