Give the shooter something they can change
A shot hits the front rim. The coach calls for more arc. The next attempt goes high and falls short. Now the instruction is “more touch.” The player has heard two corrections without a clear action for the next rep.
Connect what the hand does to the path of the ball and what happens at the rim. Backspin and arc belong in that conversation. Teach one manageable detail, let the player repeat it, and check what actually changed.
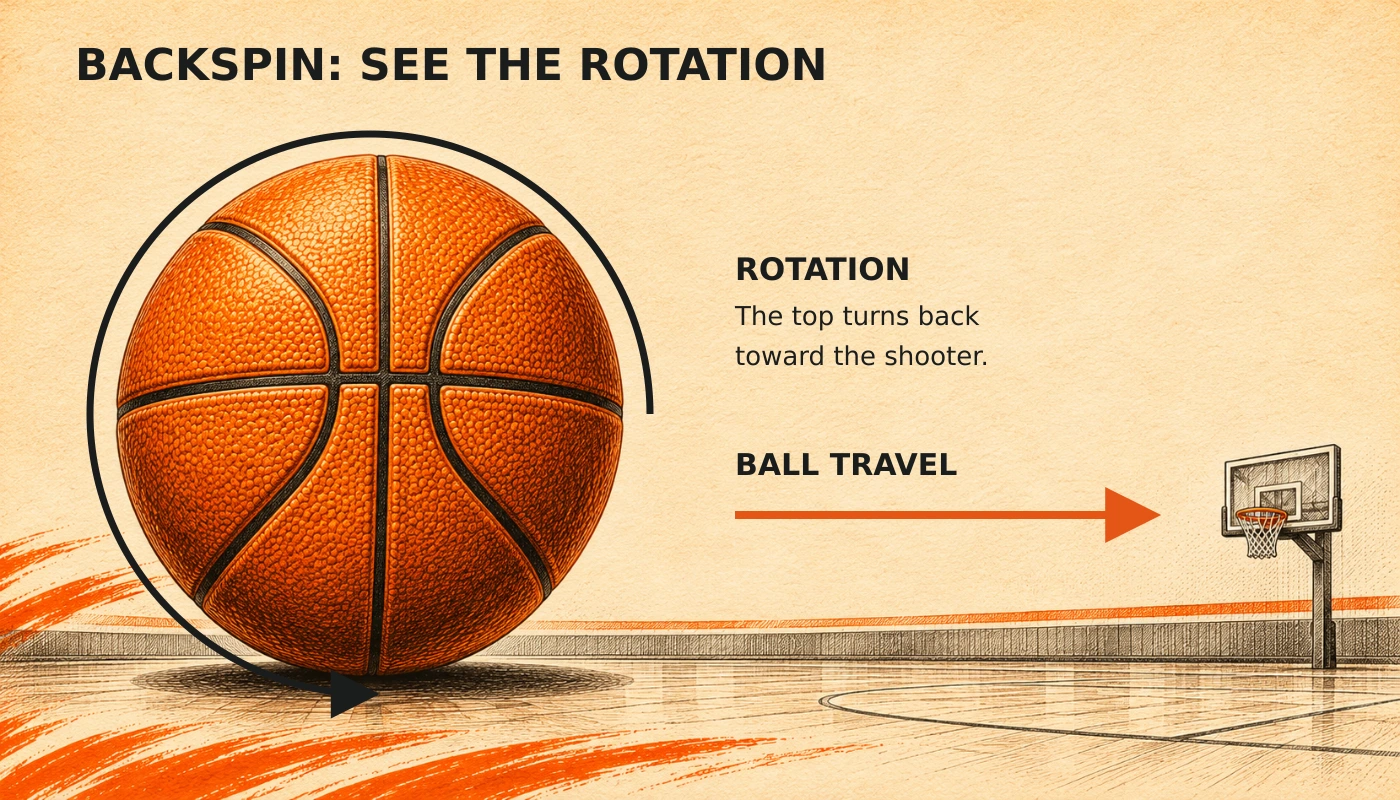
What backspin does
In a conventional shot, the ball rotates backward as it travels toward the basket. Viewed from the side, the top of the ball turns back toward the shooter. That rotation develops as the ball rolls off the shooting fingers during release.
Backspin matters especially when the ball contacts the rim or backboard. Friction during contact interacts with rotation and changes the rebound. Under some contact conditions, it can reduce the ball’s forward motion and give it another chance to drop through.
It does not make every bounce soft or keep every ball over the rim. Contact location, entry angle and speed still matter. Treat spin as one part of the shot, alongside direction, force and rhythm.
Watch the shooting clinic
Follow Coach Agmon’s set shot teaching alongside the release principles above.
Read the research before prescribing a number
Tran and Silverberg’s 2008 study tested hundreds of thousands of simulated free throws. Their model varied release height, speed, launch angle, side angle and backspin. With a release height of 2.134 meters and the other assumptions in that model, the reported recommendations included a launch angle of 52 degrees and up to about three backward revolutions per second.
Three revolutions per second is a rate, not a fixed number of rotations before the ball reaches the hoop. More importantly, a model result is not a measured training gain in real players. The percentages shown in the supplied social videos belong to those simulations.
Hamilton and Reinschmidt’s 1997 model reported a different optimal combination and found that the trajectory depended on the shooter’s release height and accuracy. Use the research to understand the variables. Find a combination the player can repeat. Do not force extra spin if it costs direction or release consistency.
Arc creates room at the rim
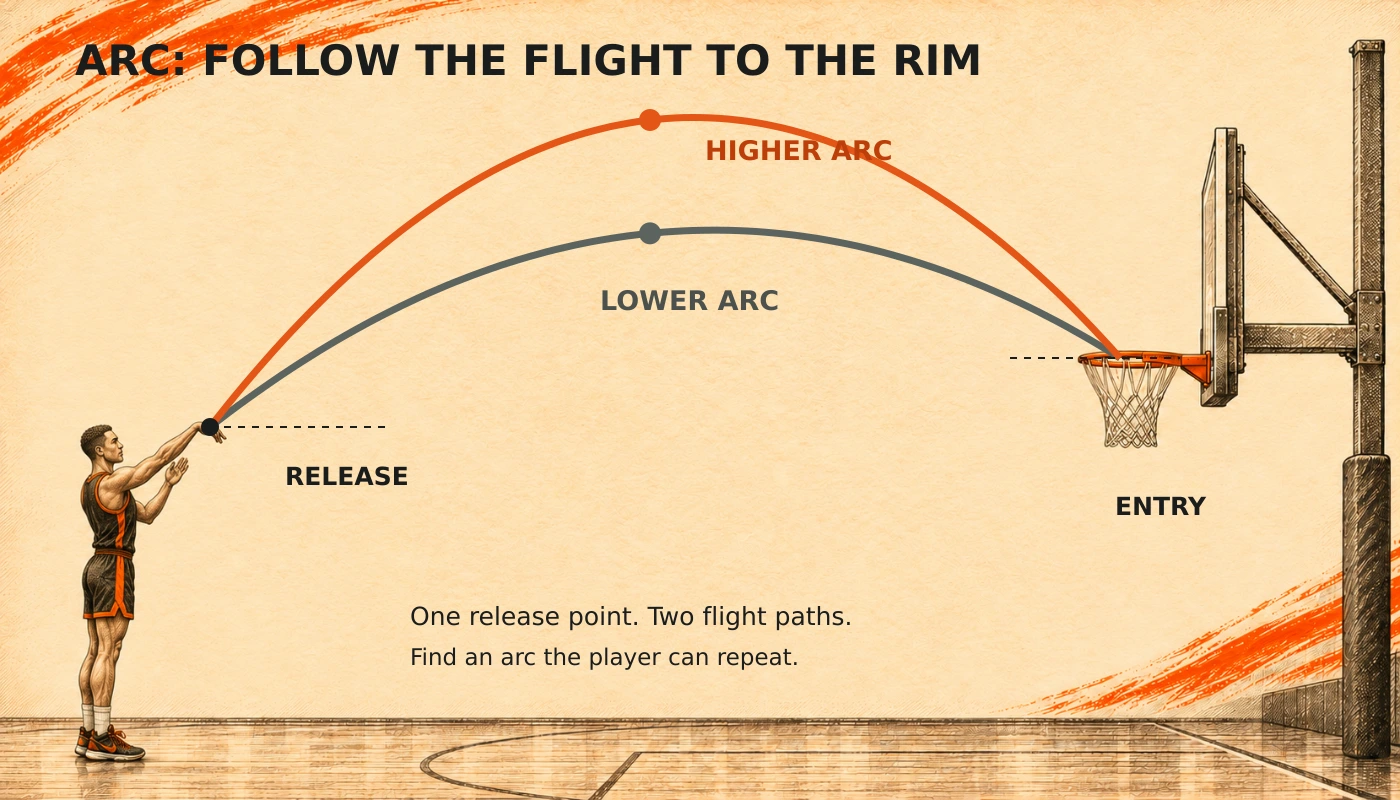
A flat approach leaves less clearance between the front and back of the rim for a clean shot. A steeper entry creates a larger geometric window. That explains why a low, hard flight can be unforgiving.
But asking for the highest possible arc misses the coaching task. Changing the angle also changes the speed needed to reach the target. An exaggerated arc can make distance control harder for that player.
Separate release angle from entry angle. Release angle describes the ball leaving the hand relative to the horizontal. Entry angle describes the descending ball at the rim. Distance and release height affect the relationship. A picture of the release alone does not tell you the arrival angle.
Three things to watch
Direction. Does the ball stay in a consistent shooting plane, or does it drift to the same side repeatedly?
Flight. Does the ball reach the rim on a usable descending path, or repeatedly strike the front with a flat approach?
Release. Does the ball leave the shooting fingers smoothly? Is the guide hand adding a push? A strong sideways rotation is a reason to inspect the hands, not enough evidence to diagnose the cause by itself.
Choose one point, occasionally two. Give the player a short run of attempts before changing the instruction. A make does not erase a repeated mechanical problem.
Drill one: isolate the release
Stand in a balanced position with the ball supported by the shooting hand, above and slightly in front of the forehead. Use a short shooting action to send it a little upward and forward into clear space. Catch it comfortably as it comes down. The guide hand can help set the ball, then separates before release.
Use ten attempts. Ask for a smooth exit from the fingers and backward rotation without a pronounced sideways wobble. Keep the toss modest. This is preparation for the full shot, not a demand to create maximum spin.
Watch: prepare the shooting action
Use the seated preparation drills to examine wrist control and the path of the shooting arm before returning to the full shot.
Drill two: keep one cue near the basket
Start close enough to reach the basket without a shoulder heave or a change in the intended release. Use three sets of ten shots. Keep the same focus through the set: for example, let the ball leave the shooting fingers while the guide hand separates without pushing.
Stand slightly to the side so you can see both the hands and the flight. Record makes and attempts. Separately, record how often the player met the chosen technical point. Move back a little when the action holds. If distance breaks the movement, come closer and rebuild.
Watch: the guide hand in close range practice
Keep the guide hand near the shooting action as you work on touch and a complete release. The two clips show the practice and the correction on the floor.
Practice and feedback
Apply the correction
Drill three: catch, read, shoot
Add a passer and a defender closing out to the shooter. Begin with a controlled closeout, then progress to live defense. Shoot when the available space supports the shot. If the defender takes it away, drive or pass according to the floor.
Keep the technical cue from the earlier drill. The test is whether the player can retain it while reading the closeout and acting on time. Score the choice separately from the execution. A missed open shot and a forced shot over a set defender are different coaching problems.
Correct the next rep
“Shoot it properly” gives the player little to act on. “Let it leave the fingers without a push from the guide hand” identifies something you can both check.
Do not prescribe more arc after every front rim miss. Look for a repeated pattern and inspect the release. A short shot can involve speed, trajectory or the timing of the full movement. Film from the side and front when useful, then connect the player’s sensation to what the video shows.
Check three things over time: whether the release becomes more consistent, whether the flight remains controlled as distance changes, and whether the player retains the action when a defender arrives. Those are the practical tests of the work.
Keep building the shot
Return to Build Your Shot: Touch, Rhythm, and the Set Shot for the full foundation. Then use Your Shooting Drill Should Look Like Basketball to connect technical work to game situations. For choosing and correcting a practice focus, read Coaching Cues and Error Correction.
Research sources
Tran and Silverberg, 2008: Optimal release conditions for the free throw in men’s basketball. A simulation study of release conditions, not an intervention trial of these drills.
Hamilton and Reinschmidt, 1997: Optimal trajectory for the basketball free throw. A theoretical model examining angle, speed, spin and individual release conditions.